What is detailed below as with
anything else on this website is purely our opinion and relating to our
experience in building our plane. It is in no way a recommendation of
techniques to use. Furthermore, before attempting a technique like this you
should already have a thorough understanding and working experience with the
techniques as outlined in Chapter 3 (education) of your builder's manual.
LoVac...
Low
Cost, Low
Vacuum, Vacuum Bagging
What we are doing
with LoVac has nothing to do with replacing conventional vacuum bagging but
rather a way to make SOME conventional lay-ups better.
If you look through
the vacuum bagging supplies section of either one of the homebuilders catalogs
you will experience sticker shock when you add up the cost of disposables
employed in the traditional vacuum bagging process. I once added it all up
and with conventional vac bagging and it looked like you throw away more
material than you have invested in the finished part.
How does it make SOME conventional layups better? What we wanted were the following
qualities:
-
elimination of
bubbles and air, especially in tight radius edges of complex shapes
-
lighter parts
-
highly conformal
lay-ups on 3D parts with either sharp convex or concave edges without the
need for large radius.
-
easy to do both
sides of a part at once
-
no bumps or
wrinkles from wrinkles and creases in peel ply
-
it would also be
nice if we did not have to spend excessive time stippling and fussing with the
part and worrying about getting all the air out.
-
no need to come
back and monitor the part for bubbles etc.
-
most
importantly.. little or no additional cost in disposable supplies
-
and finally, we'd prefer not to
have excess resin on the completed part.
-
oh, and did I
mention no bubbles...not one...nowhere?
So far we feel we
have met all those goals in the techniques we have developed and currently
use.
"Necessity
is the mother of invention.."
I still say it was
laziness, not necessity; have you ever noticed that "Yankee Ingenuity" is all based
on labor saving devices? ....hmmmmmm?
In this case it all started with the need for some parts for the Cozy I wanted
to mold and just did not want the look you would get with a large sanded radius
or large fillets; I wanted fairly sharp and well defined edges. I also knew
vacuum bagging would produce the results I wanted but was not interested in the
investment in materials and the time it would take to drive all the way to Wicks
Aircraft and back (45 min each way).
On with the show...
But first, second?
Let me go off on yet another tangent...
Early on we
discovered that it was a lot easier to keep the shop clean while we worked than
to make a huge mess and clean it later. To that end we always start each job by
protecting our building bench with a layer of thin plastic "pallet
wrap" which is a cling film similar to what you use in the kitchen. In our
case it comes on a 30" wide roll a gazillion feet long (still working on
our first roll). If it is a small part we do one end of the bench where we let
about 6" hang over the edge of the bench, taped at the corners.
If it is a big part like the strake skins we put two strips lengthwise down the
bench and let them overlap about 6"... patting down the seam as we go. then
squeegeeing it to lock it together. This material is more or less just a huge
roll of the stuff similar to what you have in your in your kitchen.. it stretches and it clings.
It stretches and
clings unless you use micro balloons anywhere near it, then it will not work.
The dust from the balloons floats in the air, comes down on the plastic and acts
like millions of little ball bearings that prevent the film from clinging.. do
not mix micro anywhere near it or this will not work.
So I had this small
part sitting in the middle of our clean bench, a light went on (in my head) and
I declared an experiment!
Declaring
an Experiment
For those of you who
work with a friend, spouse or partner on your plane you probably do as Randi and
I do and "discuss" how best to do a part.. in our case we are both
technically competent people so some of these discussions get quite heated... to
the point -one of us- may eventually stomp off and decide to not participate in
something they do not agree with, so I stomp off and do email. We have found the best way to dissipate this
is to "declare an experiment", at which time the argument ends, the
experimenter has full authority with the understanding that if the results do
not meet the other's expectations we redo the whole part with no argument. It is
also required that the both people cheerfully participate in the experiment. In
the case of failures, "I told you so's", dances of joy, endzone dances
etc are cheerfully accepted, in the case of successes, groveling, gratuitous
butt kissing etc are most appropriate.
Back to the
experiment...
We needed a source of vacuum. Understand
what we are trying to do here is not pull a huge vacuum but just enough to pull
in the outer film to hug the part.. to get the materials to conform to the part
without bulging on the outside corners and no bubbles on tight inside corners.
We are also wanting the glass to be gently pushed against the foam to prevent
any bubbles. So a source of gentle vacuum was needed. That's overstated; we
needed a vacuum pump and we had a selection of one to choose from. I had a few
medical grade air pumps left over from a project and I had a sample that was set
up as a vacuum pump. They are made by a Japanese company, Medo and cost
something like $80 in quantities, it's a high end aquarium pump certified for
medical use.
Medo USA Model
VPO125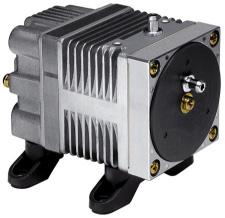
I think a Louisiana mosquito may suck
harder at 11 inches of mercury and .25 CFM.
Please pay attention
to those numbers, that's an important part of the LOW in LOVAC
Even at these low
performance numbers this little pump gets hot, to the point it stops producing
usable vacuum. We point a fan at it and it is quite happy till the resin gells.
Please note, a common way of making a pressure pump with no apparent air inlet
that can easily be adapted to vacuum is to enclose the whole thing in a sealed
box with the power cord and the pressure outlet coming through sealed holes.
This is fine for short term use but for the amount of time required for slow
resin to gell the pump will overheat.
Lets take a look at
how we do our layups because we do not do what other people do and it is
important to what we are going to do next.
In 99% of our layups we use HD aluminum foil.. the wide HD stuff is is thicker
than what you can get in the small stuff (don't experiment with the thin stuff).
We put the HD foil on the bench dull side up. It is easier to mark the dull
side with a fine line sharpie marker, it it easier to see what we are doing on
the dull side and the layup clings better to the dull side. What is important
about doing this on foil is that it is easiest to see when we have fully wet
out a couple of layers of glass when on the dull foil, it is unmistakable
when it is ready. There are many other advantages that will be explained
elsewhere on the web site.
We prep our foam part
with micro slurry, remove excess slurry. Apply the glass and foil to it, rub
down foil gently to remove excess trapped air, remove foil.
We trim as close as
possible with Dritz electric scissors. If you do not have a pair of these
electric piranhas you would not understand (don't try to describe a Jimmy Buffet
concert if you have not been to one) what close trimming means.. close
enough to remove foam.
We peel ply thoroughly.
The joy of LoVac is that wrinkled peel ply is no longer a concern, we just do
our best, the pump does the rest.
We now need a
"bleeder" layer... this is where the vac bagging supplies get
expensive and we take a departure. What the bleeder does is help air to migrate
from the glass, up through the bleeder and to continue to travel to the pump
even while the layers become saturated with resin and block off escape routes
for the air. It is important all air is allowed to escape and migrate to the
pump. Traditionally this is done with some stretchy perforated film and then
covered with some porous and absorbent layer. We are going to do this with two
layers of the cheapest paper towels you can find. What will happen is that until
they become saturated through with resin, they are holding the outer sealing
film away from the glass and providing a path for the air to pull up through the
paper towels and out to the pump.
In terms of normal vacuum bagging, the bleeder layer also performs another critical
function. If we are going to apply a huge amount of suction to a part, under
heat and all that, then we need to be able to control how uniformly the resin
will be distributed and absorbed from the part. This is done through a
perforated bleeder membrane that causes the resin to be distributed evenly then
excess escapes through the holes and into the absorbent layer. What we are
trying to do instead is blot up the excess resin with some paper towels then
apply gentle even pressure to the whole layup.
This brings up
another critical issue; we have only done this with warm MGS epoxy. MGS when
warm is very very fluid and thin. This technique may not work well with other
epoxies.
Next we need to get
the vacuum tube from the outside world into the layup as well as prevent it from
sucking in resin and damaging the pump. First, we use about a 6-8 ft length of
tubing, if we ingest that much resin we are really screwing up and saturating way too much!
Second, we take a paper towel, fold in half three times and put a small piece of
tape on it to keep it folded. We then slip the end of the tube in between the folds and
put a small piece of tape on it to stop it from slipping off. We call this
"filter" the wad. This wad is then placed alongside but not on the
part in the middle of the longest edge. We make sure it is as near the part as
possible and overlapping the paper towels coming off the edge of the part to
allow a path for the air. It's secured with small bits of tape as needed.
Lastly, we put a layer
of cling wrap over the top of the part, making sure if it is a 3D part that
there is plenty of slack excess wrap in the area of the part... this extremely
low vacuum will not stretch the plastic to pull it into depressions and inside
corners, therefore we must provide the excess material.
Its important to
make sure there is
at least 6 inches of excess cling film top and bottom all the way around the part,
then turn on the pump. This is a very low volume, low power pump so we do not
expect anything to happen yet.
Next we go around
the edges of the film patting it flat to cling to itself, then from the outside
inwards, folding over an inch all the way around. This is done a second time. Remember
the warning about mixing micro anywhere in the room with the film?
Where the hose comes
out there are two ways to seal it. The first is the simplest when it works... we
just put our palms on the plastic covered hose and roll it back and forth, the
plastic clings and the vacuum causes it to all stick tightly. If that does not
work, the second way is almost as easy. We take 4 pieces of masking tape 3
inches each. the first two go from the bottom layer around the edge on to the
top layer, one each side tightly against the tube. The second two go parallel to
the film edge from one of the first tapes over the tube to the other tape, same
on the bottom, roll between fingers to seal.
If there is a lot of
air to suck out we just put the tube up to the shop vac hose then attach it to
the small vacuum pump.
Ever skinned a
catfish? First time for me was about 12 years ago up the Sacramento river delta,
cruising up the delta for about a week it only seemed appropriate to fish and
eat what we caught, we caught catfish. My older and wiser friend just sat back
and watched with a wry smile on his face as I approached the task like I was
about to skin a fresh peach. I soon discovered I'd have an easier time peeling
the retread off an 18 wheeler. Bill finally reached into his tool box for boat
repairs and handed me a pair of vise grips and a pair of needle nose pliers...
That said, you needed to be prepared
for the next step. This is the part where a little patience and timing can make
life a lot easier on you. Once the resin has gelled you have to pay attention to
how crisp it is getting. At some point the wrap, paper towels and peel ply will
come off relatively easy. We call this the green stage, it comes somewhere after
the chewing gum stage. Too early and the cloth and resin will want to come off
with the disposables, too late and you are going to get practice skinning
catfish. When you get it just right it comes off in a flash.
If you wait too long and it is very difficult to peel all you need to do is use
a hair dryer on it and peel while it is still hot.
Actually not that
hard if
you start at the edges and get the edges all peeled up. Apparently at least one
of our friends tried this and has whimped out for a Teflon bleeder ply. All we
can say is we have done parts as small as hose mounts and as large as our strake
skins and had no trouble at all removing the skins.
So there you have
it, LoVac... pictures coming soon as they become available